Buying & Installing A Wood Fired Oven

This summer I purchased a wood fired oven. After doing a bunch of research on the subject I ended up buying one from Eugene at Grills N Ovens. You can spend a LOT of money on these things depending on the make and model you choose. On average you are looking anywhere between 1k and 6k. For me, I saw myself utilizing this thing maybe once or twice every couple of weeks. It’s one part cooking novelty and one part outdoor decoration. Having looked around in various BBQ stores, I was pretty certain i didn’t want one of those metal monstrosities and I felt the difference in ‘cooking experience’ was marginal from that of your indoor oven. As such, I went with one of the solid ones from Grills N Ovens.
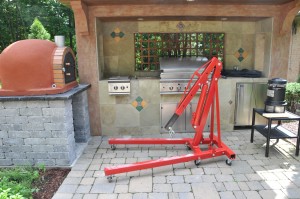
The unit arrived on a pallet. I was warned that it was not ‘like the ones at the BBQ store’ – i.e. a few sheets of welded metal and a couple hundred points. In fact, the unit was about one and a half tons. Moving this into place was not going to be easy. While the unit is delivered with a specialty pallet lift, there wasn’t much of an opportunity to get that up steps and down a narrow path to it’s final resting place in my backyard. Eugene suggested renting a 2 ton engine hoist to move the unit. Sounded easy enough. He even had some pictures. Well, it wasn’t easy by any stretch of the imagination.
The first challenge was finding the hoist. Most Rent-Alls don’t stock these things – because they are not a common rental item that is going to make them money and if someone needs it, they need it for a while and are more likely to buy it. I ended up finding one on Kijiji and borrowing a truck to move it. Next step, you can just lift this thing straight away, you need straps to attach from the hoist to the oven (they smartly build in metal clamps you can attach to). I bought some standard straps from Home Depot (the kind you would utilize to secure a load in your truck) for about $25. Take your time lifting the thing. Seriously. It is a delicate balancing act. You might also want to pick your hoist wisely. Rubber wheels are a better choice vs. metal. I had metal and it was one hell of a time moving this thing on the cobblestones to the back of our place. Another tip, you’re gonna need some thicker sheets of plywood. I utilized this to get up stairs and to line the edge of our path which was about 3 inches too short to accommodate the full width of the hoist. To get it up steps, we had to utilize a winch hooked up to a tree. From there, you just move inch by inch, moving the plywood, adjusting – pushing. We did it with two people, but you could easily utilize a third.
Finally, once you get to your final location, I hope for your sake that your width can accommodate or you have a space in the middle of the area you are placing the oven. Our design had a space in the middle where we planned on storing wood. Even still it was difficult. Final placement involved swinging the oven like a bit of a pendulum and easing off on the hoist for it to drop in the approximate location we wanted it.
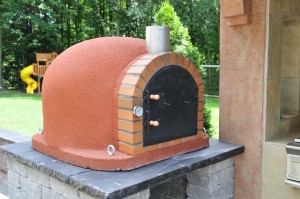
You’ll note some good and bad things about our placement in the picture below. The good is the design approach we took on the stand. This was built utilizing BestWay Stone product. Classico Antico…or something like that. On the top we had (what I think) was a bright idea to pick up the look of the pillars with long slate stone that stretches across the top horizontally. Realistically we could have rested the oven right on top of the stones – but aesthetically this looked nicer and adds an extra bit of stability. It also removes the need to use a layer of metal and place the stone on top of that. I think the only negative with our placement was the relative proximity to our BBQ overhang. The oven stays remarkably cool, so it isn’t so much a heat issue as it is a smoke issue. Perfect world I wouldn’t have run a pipe from the top of the vent, but because of the close proximity, I have been forced to extend the vent to above the BBQ overhang (which you can see in some of the pics I will post later.
Anyways, this was a fun challenge – and after some light usage, we are pretty happy with the oven.

